


Flanger, or the "Jet Plane" Effect
What it is, where it came from & how to use it in your music projects

Welcome back to this mini-series on three common types of modulation effects: chorus, flanger, and phaser.
You may or may not have heard of a flanger before—but you most likely will have heard it in many popular songs: you can hear two good and evident examples in the Outros of Jimi Hendrix’s song “Bold as Love” (1967) and Tame Impala’s “Mind Mischief” (2012). My personal favourite use of it is on the drums of the intro to Blink-182’s “I’m Feeling This” (2003).
Perhaps you play the guitar, and you’ve come across the flanger in the form of a guitar pedal, or you perhaps you have seen them built into in popular software synthesisers like Serum or Vital. You can also typically find them in the audio effects section of Ableton Live, Logic Pro, FL Studio and other DAWs.
Last week, we covered Chorus, a modulation effect that adds thickness and texture to a sound by copying an audio signal, and adding a bit of delay.
A flanger works quite similarly to a Chorus, though its overall sound is quite different and distinct from it: it has a metallic, swooshing sound reminiscent of a jetplane flying overhead. Here’s how electronic music engineer Harald Bode described the effect back in the 1984:
The flanging effect can be commonly observed out-doors, when a jet flies overhead, and the direct sound is summed in the ear of the observer with the sound reflected from the ground, resulting in the cancellation of certain frequencies and producing the comb filter effect, commonly referred to as “jet sound.”
In this newsletter, we’ll cover how the flanger works, how it first came to be used in popular music, and how to push it to its limits.
Who flanged first?
OK, let’s get the most pressing question out of the way first: why is it called a flanger? In the world of analog recording, a “flange” refers to the rim of a reel on a tape machine. Back in the analog days, you could delay a recording during playback by simply pressing your finger against the rim of the spinning reel. If you simultaneously had another copy of that same recording playing, the two tapes together would produce phase interference, yielding the now-familiar and iconic flanging sound.
A quick Google search reveals that there are three competing origin stories: some claim that Les Paul innovated the technique as early as 1945, and that it can be heard on his track Mammy’s Boogie (1952). Though I have to admit: I honestly don’t hear it. Another competing story is offered by George Martin, the legendary Beatles-producer who remembered John Lennon coining the term to describe the artificial double tracking (ADT) technique that EMI recording engineer Ken Townsend had innovated for the The Beatles’ album Revolver (1966). However, contrary to many people posting online, I was also not able to discern the effect on that album.
To me the most convincing historical instance of flanging can be found in a single coming out of Gold Star Studio in Los Angeles.
The year is 1959, at Gold Star Studios in Los Angeles; recording engineers Larry Levine and Stan Ross are working on a track called “The Big Hurt.” It is a single recorded by then-more-famous Toni Fisher, and written by her husband and songwriter Wayne Shanklin. The vocal takes of Toni Fisher having already been in the can, but needing more prominence in the mix, the two recording engineers resorted to doubling the vocal take by copying the tape and playing back both simultaneously. The experiment “failed” in the sense that the engineers could not get the two tape recordings to play exactly in time, a metallic “flanging” effect ensuing with the two effects playing ever so slightly out of synch with one another. Despite its unintentional use, Wayne Shanklin liked the effect so much that he decided to keep it on as a sort of novely effect. You can hear the flanging effect throughout the song, right from the beginning:
How it works
A Flanger works by taking an audio signal, copying it, and delaying the copied signal by a tiny amount, somewhere between 1 and 15 milliseconds. Flanger is a modulation effect, because it uses a low-frequency oscillator (LFO) to modulate the delay time of the copied signal. Gliding backwards and forwards, the delayed audio signal constructively and destructively interferes with the original signal, generating new frequencies, that result in slight bends in pitch.
Here is a drum sample, with no effects applied:
And here’s that same audio with a flanger effect applied:
As you can hear, the drum sample sounds more wobbly, slightly more tinny, and has pitch gliding upwards and downwards. The pitch bend effect can be made more or less dramatic by manipulating LFO parameters:
Notice that in this more extreme example, the effect sounds metallic, but also a little bouncy. The pitch-bend quality is really what distinguishes the flanger from its cousins, the chorus and phaser effects.
Comb-Filtering
Comb-filtering occurs when two signals, one delayed relative to the other, are combined. When the delayed signal is added back to the original signal, certain frequencies may reinforce each other while others cancel out. This creates a series of peaks and notches in the frequency response, resembling the teeth of a comb. These peaks and notches are spaced apart at regular intervals determined by the delay time between the two signals. In flanging, comb-filtering contributes to the distinctive “swooshing” sound as the peaks and notches move across the frequency spectrum due to the varying delay time. The comb-filter can be very clearly seen in the way the Vital synthesiser displays the comb-filter:

Basic Controls
Since the flanger is a modulation effect, its controls are those of a low-frequency oscillator (LFO). If you are comfortable with basic controls of an LFO, you will find the flanger to be quite familiar:
Rate: This controls the frequency, i.e. how quickly the LFO waveform modulates the delay time. It’s usually measured in cycles per second (Hz), though often a switch lets you sync the LFO rate to the project tempo (BPM).
Depth: This determines the amplitude of the LFO waveform, i.e. the intensity with which the LFO modulates the delay time. Increasing the amplitude/depth will result in a more pronounced modulation effect, while decreasing it will have the opposite effect.
Mix: Allows you to blend the original (dry) signal with the affected (wet) signal, providing a control dial over the amount of the overall flanger effect.
These are the basics of the flanger effect, with the first two controls corresponding to the LFO, and the mix dial giving you a control dial for the overall effect. These are in effect the same dials that you find in Logic Pro’s Stock Flanger plug-in:

Advanced Controls
Some flangers are equipped with more advanced controls, such as:
Feedback: slightly delayed signal (which is shorter than that of the chorus) is fed back into the delay line input. Increasing the feedback makes the effect more pronounced, adding a ringing or resonant quality to the sound.
Waveform: Some flangers have option of selecting different waveforms for your LFO, like sine waves, sawtooth waves, square waves, and the like. Ableton’s Flanger unit is a good example, which lets you select between sine wave, sine, square, triangle, sawtooth up, sawtooth down and random.
Delay time: Occasionally you can manually adjust the delay time of the copied signal.
Phase: A phase control (sometimes called offset) adjusts the starting point of the LFO waveform. This can affect the way the delay time is modulated, creating different interference patterns.
Filter: Some Flangers allow you to use a filter, to cutoff frequencies in the delayed signal.
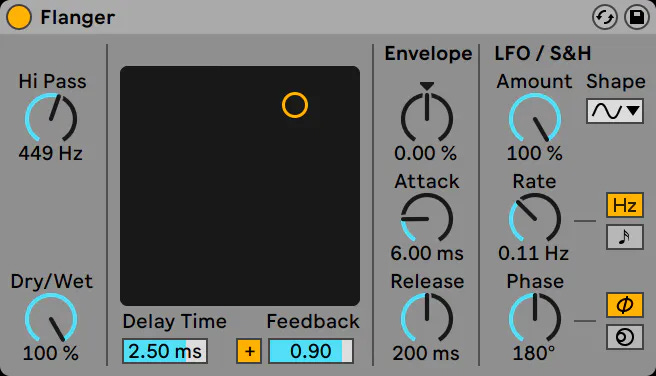
Ableton Live’s Flanger effect has all the basic controls (amount, rate, dry/wet), but also all of the advanced controls above, plus an envelope. Ableton has by far the most feature-packed Flanger plug-in of all the DAWs, offering an extreme amount of control.
Pushing the Limits of Flanging
To round this article off, I’ve created a short composition using Logic Pro’s Stock Flanger plug-in. It plays with the rate, depth, and feedback controls, uses some automation to change these parameters over time. The short drum composition uses a stock Apple Loop, which begins and ends the composition. Notice the watery, metallic, and pitch-bendy sounds a flanger can produce:
References
Here are a couple of references I put together in researching this article. You might find some of them useful or helpful:
Harald Bode, “History of Electronic Sound Modification.” The Journal of the Audio Engineering Society, 32, No.10, October 1984.
Tiny Mixtapes, “1959: Toni Fisher - “The Big Hurt”
Audio Technology, Tape Flanging in the New World
MusicRadar, The Beatles, Les Paul, or Larry Levine? Who really discovered flanging?
Native Instruments Blog, What is a flanger? How to use it in music production
Emily Hopkins, I got every flanger pedal to see why no one cares about them
Charly Sauret, How FLANGER, CHORUS & PHASER process your sound - Sound Design Theory
Do let me know if you have any questions, and I’m always open for suggestions for music production topics to write on.