


Ableton Live’s 5 Track Types Explained
Read this if you want to understand Ableton Live at a fundamental level.

Ableton Live is built on five distinct track types—Audio, MIDI, Return, Group, and Main—and understanding how each works is essential for mastering this versatile piece of software. These track types aren’t just unique to Ableton; they form the backbone of all major Digital Audio Workstations, like Logic Pro and Pro Tools.
Whether you’re new to music production or revisiting the fundamentals, this guide offers a clear, practical breakdown of each track type, giving you a foundational resource you can return to again and again. If you’ve find this resource useful, feel free to share it with a producer-friend.

Audio is the cornerstone of modern recording and sampling. Think microphones capturing vibrations, sound waves traveling through the air—it’s the physics behind what we hear. Like any DAW, Live is designed to manipulate audio. The fact that “audio” is right in the name of Digital Audio Workstation underscores how essential it is to the software’s design.
One of the most recognizable aspects of audio is the waveform, a visual representation of a sound’s amplitude over time. The waveform indicates how loud or soft the sound is at any given moment, with peaks representing louder moments and valleys indicating quieter sections. If you’ve used apps like Voice Memos on your phone, you’ll recognize the familiar look of these waveforms.

Audio tracks are where clips live and are arranged, serving as the foundational building blocks of your music. You can edit audio clips directly in Arrangement View. For example, you can manipulate the amplitude of an audio clip by using the fade handles. When you hover your mouse over the clip, small squares appear at the bottom corners. These act like volume controls, allowing you to create smooth fades in or out, adjusting the clip’s amplitude with precision.

Beyond fading, audio in Ableton can be edited in other ways, too. You can reverse it (⌘R), split and join clips (⌘E and ⌘J), copy and paste (⌘C and ⌘V), and rearrange clips in Arrangement View. These versatile tools provide you with endless opportunities for creativity when working with audio.
Ableton Live is also known for its powerful warping algorithms, which allow you to stretch or compress audio without changing its pitch. Conversely, you can pitch-shift audio without altering its duration. I’ll go into these in more detail in a future Newsletter on Live’s Clip View.
Finally, audio clips can be further processed using any of Live’s audio effects—such as Drum Buss, Auto-Filter, or Roar. By combining these effects with Ableton’s arrangement tools, you can transform your audio clips in almost any way imaginable.
Essential Shortcuts
Create Audio Track: ⌘ + T
Rename Track: ⌘ + R

MIDI, short for Musical Instrument Digital Interface, revolutionized music instruments in the 1980s by enabling digital instruments to communicate with each other via a protocol. Ableton Live began as audio manipulation software, but with the release of Live 4 in 2004, the software expanded its functionality to host MIDI tracks as well. This update introduced a piano roll and the ability to play MIDI instruments, transforming Live into a DAW that could handle both audio and MIDI.
Unlike audio, MIDI is a data protocol. MIDI itself does not produce sound. Rather it contains instructions such as pitch, velocity, and duration that tell a digital instrument what to play. MIDI tracks in Ableton require an Instrument Device to convert these instructions into audible sound. Here’s how the process works:
MIDI Input: MIDI tracks receive data, represented in Ableton by flashing orange dots, indicating the transmission of MIDI signals. These signals can be shaped using MIDI Effects (e.g., Melodic Steps, Arpeggiator), which alter the MIDI data before it reaches the instrument.
Instrument Conversion: A MIDI Instrument Device (e.g., Simpler, Operator, Drift) on the track converts MIDI data into audio output, transforming silent instructions into sound.
Audio Processing: Once converted to audio, the signal can be further processed with Audio Effects—such as Reverb, EQ Eight, or Echo—just like any other audio track.
MIDI tracks offer more control than audio tracks. While audio tracks can only host one type of device (Audio Effects), MIDI tracks can host three: MIDI Effects, MIDI Instruments, and Audio Effects. This also means MIDI Tracks generally take up more CPU power than Audio tracks.

The main indicator that allow you to distinguish MIDI tracks from Audio tracks is the red arm button (see above). A circular arm button indicates an Audio track, whereas a round arm button with a musical note inside indicates a MIDI track.
Essential Shortcuts
Create MIDI Track: ⌘⇧ + T
Rename Track: ⌘ + R
Routing Tracks
In addition to Audio and MIDI, Live has three further track types. I’m calling these Routing Tracks, because their primary purpose is to take an audio input, do some processing to it, and route it somewhere else.
These are called Group, Return, and Main Tracks. All three cannot host Clips, but they can host Devices—specifically Audio effects, like Reverb, Tape Delay, Flangers, Roar, and other Devices. They all serve different purposes, which I’ll go into below.

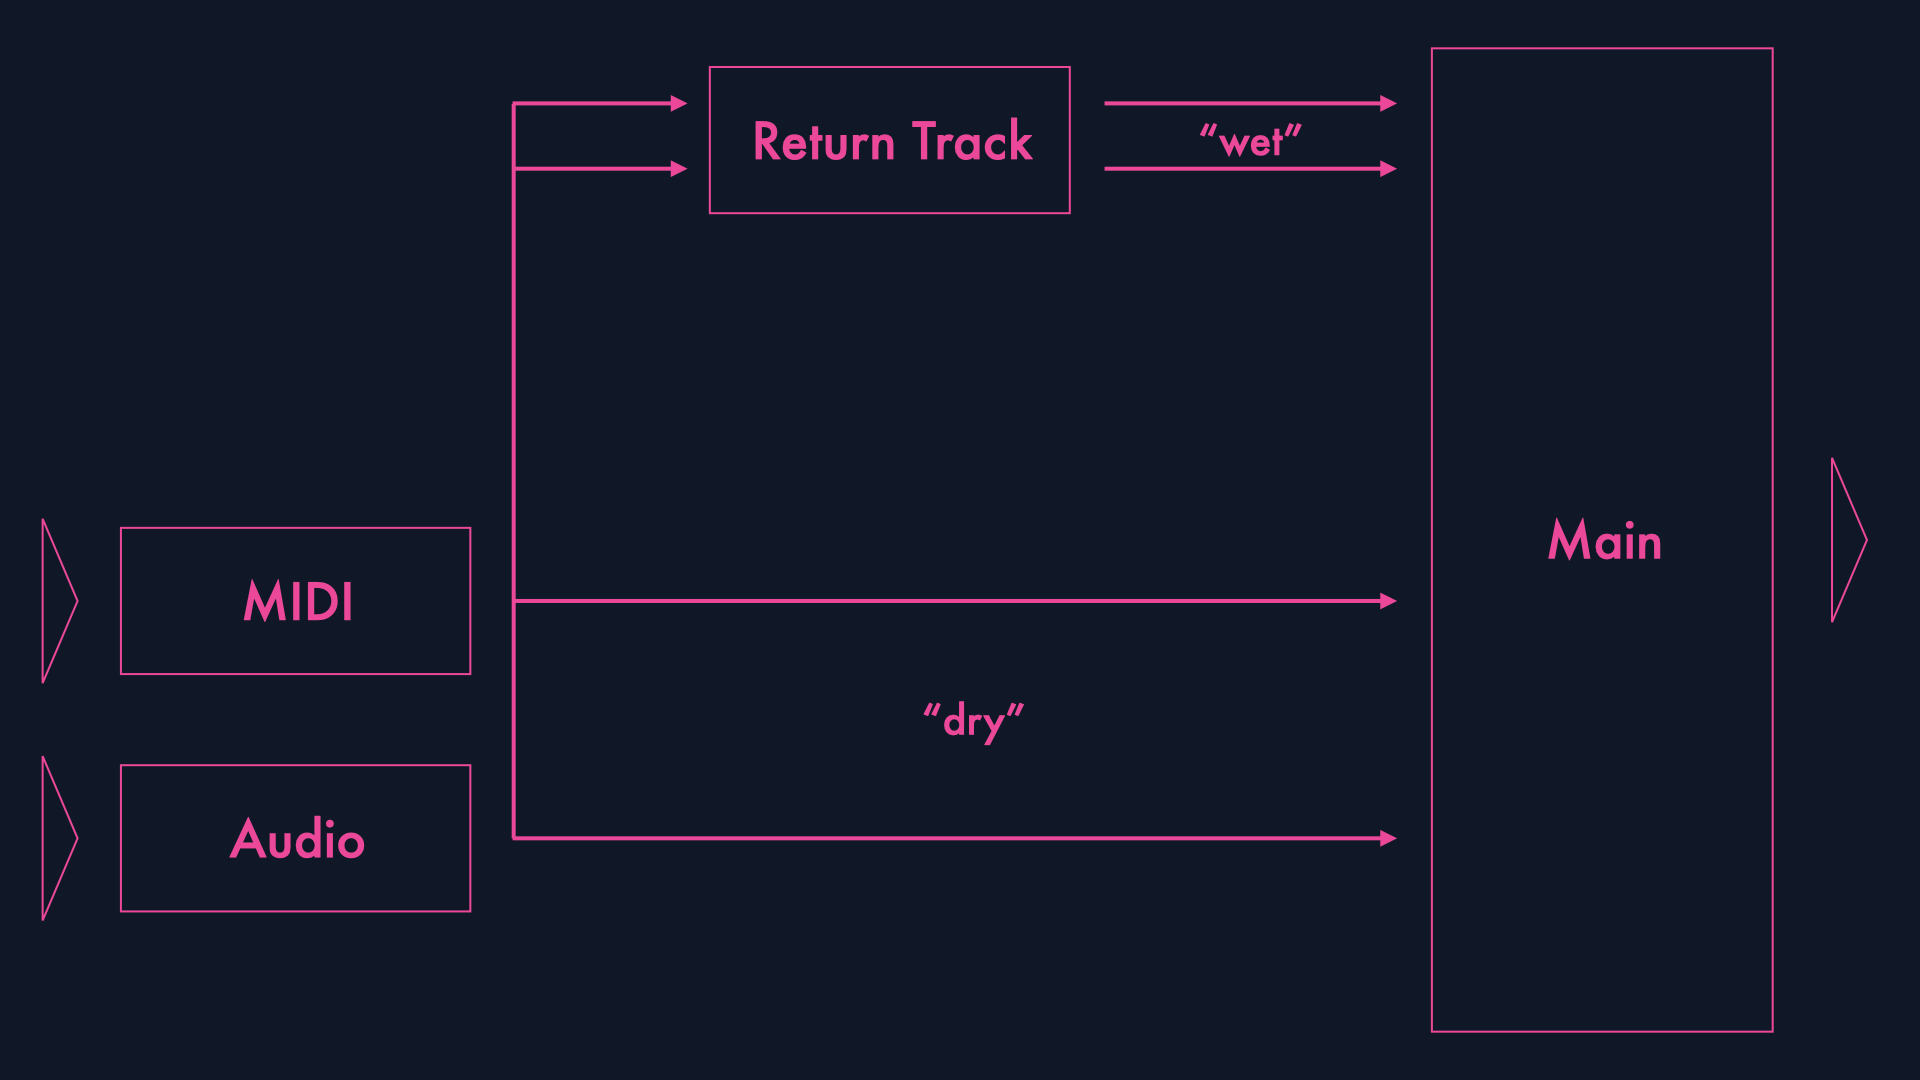
Return tracks in Ableton Live serve one key purpose: group processing. They let you apply a single Audio Effect—like reverb or delay—to multiple tracks at once. When you open Ableton, you’ll notice two default return tracks labeled “A Reverb” and “B Delay,” each loaded with stock effects. You can add more as needed, but these two illustrate the basic concept: efficiently sharing effects across tracks.
In other DAWs, return tracks are often called aux tracks, busses, or auxiliary busses. This concept has its roots in the analog mixing consoles of the 1950s, where engineers used auxiliary send and return circuits to route audio to external effects like reverb chambers or tape delays. They thereby split the audio into “dry” (unaltered) and “wet” (effected) signals, applying effects without altering the original sound permanently.
Here’s how it functions: audio from MIDI and Audio tracks is split via the Send knobs, little volume controls that can be found on Audio or MIDI Tracks. One part (the “dry” signal) goes directly to the Main track, while the other is sent to a Return track, where it is processed with effects and then “returned” to the mix. The Send knobs control how much of the “wet” signal is sent to the Return track, allowing you to balance the dry and wet signals. Think of it as sending the audio on a side quest before it returns to the main path.
Why Use Return Tracks?
CPU Efficiency: Instead of loading multiple instances of the same effect on every track, one Return track can process them all, saving valuable CPU power.
Cohesion and Simplicity: Slap a Reverb on a Return track if you want your keys and vocals to sound like they’re in the same room. This saves time and gives your mix a unified sound without the hassle of fine-tuning each track separately.
Return tracks simplify your workflow while enhancing both CPU performance and aesthetic coherence.
Essential Shortcuts
Create Return Track: ⌘⌥ + T
Show/Hide Return Tracks: ⌘⌥ + R
Show/Hide Sends: ⌘⌥ + S

Group Tracks in Ableton Live are a powerful tool that serve two primary functions: organization and group processing.
First, let’s talk about organization. Think of Group tracks like folders on your computer. You can place multiple Audio and MIDI tracks inside a Group Track, just as you’d organize files into folders. And just like computer folders, Group Tracks can be nested within each other—allowing you to create a hierarchical system of tracks that makes navigating complex sessions a lot easier. By grouping tracks, you can declutter your workspace and focus on just the sections that matter, all while keeping your session neat and tidy.

Second, Group Tracks serve as submixes. A submix treats a group of tracks as if they were one. You can control entire group of tracks using a single set of controls—just like using one volume knob to adjust the overall sound of multiple tracks. You can even add effects like compression, reverb, or EQ to the entire group, and those changes will be applied to all the tracks inside the group before they reach the Main Track.
This is similar to how Return Tracks function, allowing you to process multiple tracks with a single set of effects. The main difference is that Group Tracks act as containers for tracks, rather than being a dedicated return path. So what’s the difference between them? The answer is: not a lot. Return tracks are just an older, manual method of achieving the same thing as Group tracks: group processing.
It’s also important to note that Group Tracks don’t host clips themselves. Instead, they function as containers for other tracks, which is why they’re so useful for both organizational and processing purposes.
Essential Shortcuts
Create Track Group: ⌘ + G
Ungroup Tracks: ⌘⇧ + G
Collapse/Expand Group: U

Still with me? Great. Let’s cover the final track of the five: the Main Track.
To understand the purpose of the Main track we have to discuss signal flow, an essential concept to understand how tracks work in Ableton Live.
Imagine a river. Upstream, you have your MIDI and Audio Tracks—where sound originates. Along the way, some audio might detour through Return Tracks (like side streams adding effects such as reverb or delay), while other streams combine in Group Tracks. All these paths eventually converge downstream into the Main Track, the final section of the river before it “empties into the sea”—in this case, your speakers.
In other DAWs, Live’s Main Track is sometimes called Master Track, Stereo Out, or Master Bus in other DAWs. Regardless of the name, its function is the same: it’s the last stop in the audio chain before sound is sent to your speakers, headphones, or other output devices.
The Main Track is your last opportunity to fine-tune the mix. Here you can apply EQ adjustments, compression, or a limiter to prevent audio peaks or distortion. The term “mastering” actually originates from this process: making subtle, overall adjustments to the Master Track. Mastering ensures that the track sounds polished, isn’t clipping and is ready for distribution.
In addition to its standard functions, Ableton’s Main Track offers a unique feature called Resampling. This allows you to record the output of your entire mix directly into an Audio Track, enabling creative sound manipulation or creating a bounced version of your track without leaving the session. To use Resampling, select it in the I/O section of any Audio Track from the dropdown menu.
Still here? I wrote this guide mostly with the help of Ableton Live’s manual and doing some extra research online. If you’re looking an eye-opening explanation of how Signal travels through the DAW, you should check out Jono Buchanan’s YouTube video on Signal Routing. He does a great job explaining it. Though he uses Logic Pro, the principles are general enough to be applied to Ableton Live as well.
Now that you have used Live for a while, do you like it better than Logic Pro?